For further information and screenshots explore the map with the cursor. Be
careful - even unmarked areas could be sensitive. Be patient also - some of the
screenshots are animated and will need some time to download. Please close every
little pop up browser window before you initiate a new one.
There are more maps available for this level.
Rotate
through the different views.
Overview
This is the home of the peaceful Lizardmen and a few human bandits. Here you will
come across the first talisman. If this is your first visit you will return several
times, even if you have explored every corner of this exciting location during your
first stay.
... good that you are making headway but hurry. Learn as much as thou art able of
the Talismans. Cabirus created them and thou shouldst collect them all. Talk to
the inhabitants of the Abyss. Some are still civilized and can help. Final hope
in this dream...
- Garamon in an Avatar's dream
Population
Lizardmen (friendly)
a Human (friendly)
Bandits (human, hostile (most of them))
Headless (hostile)
Skeletons (hostile)
Giant Rats (hostile)
Bats (most hostile)
a Mongbat (hostile)
a Rotworm (hostile)
Bloodworms (hostile)
Giant Spiders (hostile)
Lurkers (hostile)
a Gazer (hostile)
a Ghost (hostile)
Slugs (hostile)
Things you must do
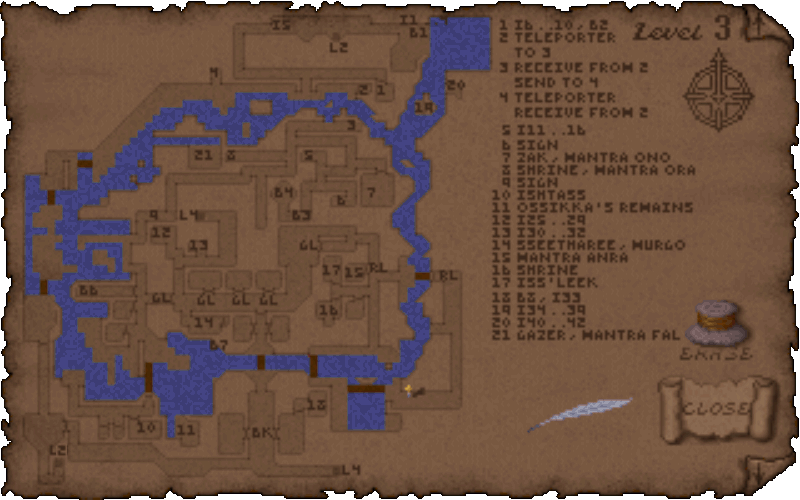
Look for the blade of Sword Caliburn. You will get a hint about the location of
this item from the book near Ossika's remains. The blade is in a hidden chamber
under a pond in the southeast. Look for a vine-covered wall in this area and
remove the vine to get access to a lever behind a secret door. Pull the lever to
drain the pond.
There are more items you must pick up here but this will happen (and be told)
later.
Talk to Sseetharee several times until he is willing to release his prisoner
Murgo. Murgo will teach you the
lizardmen language, don't set him free until
you are familiar with the whole language.
Talk to Zak. He will tell you about his fears and you will need this knowledge
later to get a special item.
Things you should do
Talk to Ishtass and look for Ossikka. You'll find his remains and some items
(I20..24) in the southwest on a platform by a river. You will appear near this
place if you took the bumpy ride from level 2. Bring back the scroll from Sir
Cabirus to Ishtass. You will get some items (B5) including a Wis rune stone (be
careful, this will be the only one in the entire game) as a reward.
Give a red gem to Iss'leek (any red gem will do it). Iss'leek will give you a new
spell 'Ylem Por' which allows you to walk on water. You can use this spell to
eliminate the lot of lurkers easily.
Heed the 'Ask Shanklick about crazy wizard' plaque at Ossikka's bones. You'll meet
Shanklick in a deeper level.
Use the red lizard key (B4) to open all the locked doors in the red lizardmen
area. The corresponding doors are marked with RL on the map.
Use the green lizard key (B6) to open all the locked doors in the green lizardmen
area. The corresponding doors are marked with GL on the map.
Use the bandit key (B3) to get access to the thieves' storage rooms in the south.
The corresponding doors are marked with BK on the map. The bandit in the western
room owns a magical ring - an unblemished red ring of Resist Blows. You can trade
and get this ring for a little gold.
Things you can do
There are two switches which will summon monsters. One is in the northeast at the
end of a long hallway near a secret door (1). This switch will summon headless for
a while. The other is in the northeast as well but closer to the center (5). This
switch will summon giant rats. You can use this opportunity to gain some more
experience points.
Not all of the bandits are hostile by all means. Try to be polite and they will
change their alignment from upset over mellow to friendly. You can even talk to
the head bandit and ask him for the blade of Caliburn (use What about ...
"blade").
Items
Click here to get a list of level 3 items in a new browser window.